Use this manual to install Signalator Autotraders (software for automated execution of trades) in just several minutes. Before you proceed, please make sure you have an active and installed metatrader account (MT4/5). If you do not have an account or you have not installed a metatrader platform, please do it prior to installing Signalator Autotraders.
Your PC or VPS you are install Autotrader must be online from Monday 1:00 till Friday 21:00 GMT time. Otherwise trades won't be executed. If you can't have your PC running nonstop, consider using Signalator VPS (provided for free with a number of subscription or for a small monthly fee). Please note: you will be able to download and install autotraders only if you have an active Signalator subscription.
Signalator autotrader is only an automated execution of trades. All trade decisions except for signals marked EA are made and controlled by human traders
Step 1. Log on to your personal page (enter login / password credentials on any Signalator page). Then click the "My Subscription" link. If you have any currently active subscription, you will see a table similar to one shown below. If you have no active subscription or your subscription is free, you will see a table without autotrader option. Autotrader will only work if you have any active subscription with Signalator.
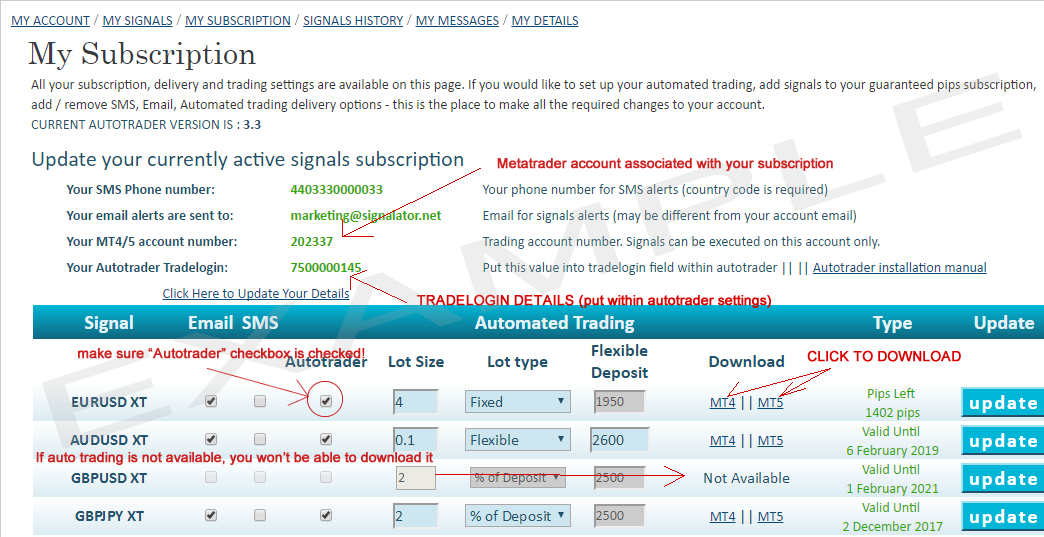
If you have more than one active currency pair, you will need to download an autotrader to each available currency pair. Please note: EURUSD XT and EURUSD signals have different autotraders and if you trade both you will have to download and install both as well. There are two available options: MT4 and MT5 links. If your trading account is a metatrader 4 account with *.ex4 extension, you shall choose MT4 link. If you trading account is a metatrader 5 account with *.ex5 extension, choose MT5 link to download.
Step 2. Make sure you have the "Autotrader" check box in "checked" status. Otherwise, you will receive an error within an autotrader displaying you have no active subscription associated with your trading account.
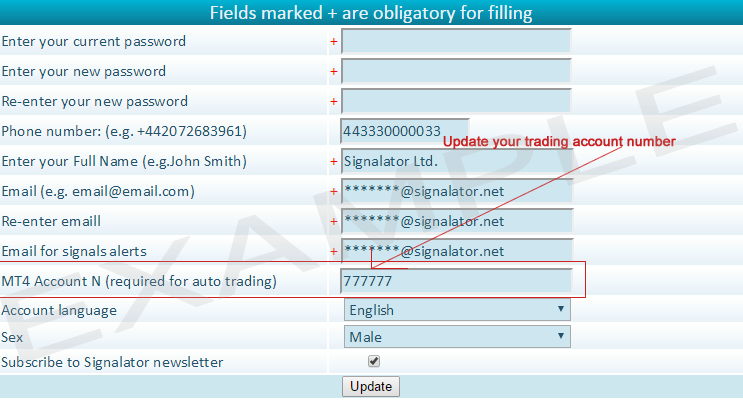
Step 3. Check whether displayed MT4/5 account is the account you are going to install your autotraders. If this is not the case, go to my details to update / add your trading account details. Click the "My Details" link to make amendments to your account. Otherwise, you will receive the account error message within your autotrader.
If you require to set a separate account number for any of your available autotrader, please contact support team. Please note: this feature may be a subject to additional charges.
To update your details, you will be asked to enter your current password.
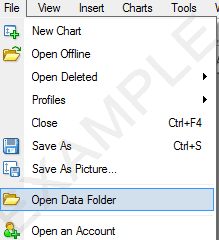
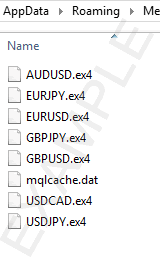
Step 4. Save your downloaded autotrader to AppDataRoamingMetaQuotesTerminalXXXXXJLKSKDF9SDFJKFLSDFMQL4Experts folder. To access this folder, click the File->Open Data Folder option. You will be redirected first to AppDataRoamingMetaQuotesTerminalXXXXXJLKSKDF9SDFJKFLSDF, then open MQL4 folder and finally Experts folder. Save all autotraders you are going to use into this folder. Please note: XXXXXJLKSKDF9SDFJKFLSDF is shown as an example. Your folder name will differ from one published here. If you are upgrading your autotrader to a newer version, you will have to overwrite currently available autotraders within this folder.
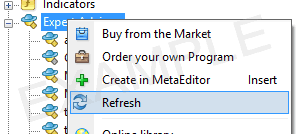
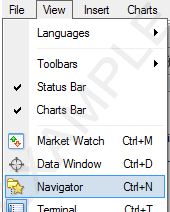
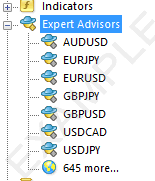
Once you've done, click the Refresh button within the Expert Advisor folder (right-click). After refresh you should see a list of all downloaded autotraders within the Expert Advisor folder (on the left hand side) . If you can't see this folder, either click Ctrl+N or click the View folder and then the Navigator folder. If you still can't see autotraders you saved, please go back to the beginning of the Step 4 to check if you have missed anything. Every time you update or add your autotraders, it is required to save autotraders and click the refresh button.
 Step 5. Signalator Autotrader connects to Signalator website to get trade details and to get information about your subscription. If it can't connect to the Signalator website you will receive a "connection to website" error.
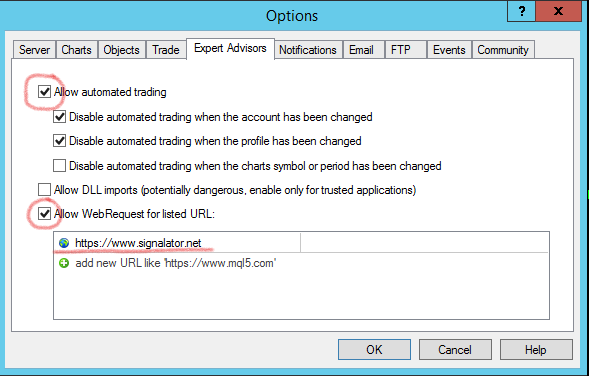
To allow an Autotrader to connect to the website, click the Tools->Options link or press CTRL+O. You will see an Options tab. Navigate and choose Expert Advisors tab. The following options are required to enable Autotrader:
- Check Allow automated trading
- Check Allow WebRequest for list URL
- Add "https://www.signalator.net" url to the list of URL.
This will allow an autotrader to connect to the website for getting information about your trading.
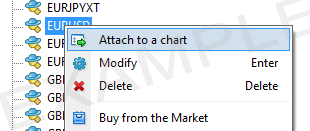 Step 6. Repeat the following step for each of a trading signal you are going to trade with. The following example is used for the EURUSD trading signal. Open the trading chart window for EURUSD currency pair: click the File folder, then the New Chart link and choose the EURUSD (or if you broker has any variations of this currency pair, e.g. EURUSDfx or EURUSDmini, etc.) You can use any time frame (1M, 1H or any other), any type of chart display (candlestick, line or any other). For example, when the chart is opened, drag the EURUSD expert advisor (Autotrader) to the EURUSD chart or click on the EURUSD.ex4 EA and then right click the Attach to the chart link.
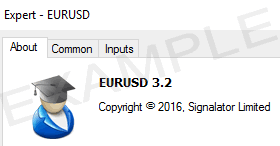 Step 7. By the end of the Step 6, you should see the attached autotrader with 3 available tabs for MT4 autotrader (About tab is available with MT4 only - picture on the left) and 2 tabs for MT5 autotrader. About tab shows current autotrader version and the title of your autotrader. Two other tabs are required for a proper automated trading.
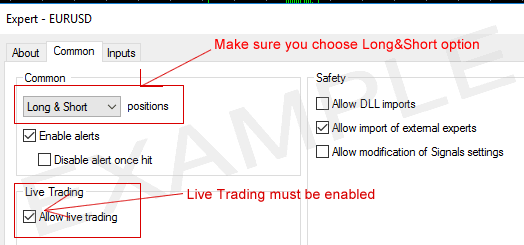
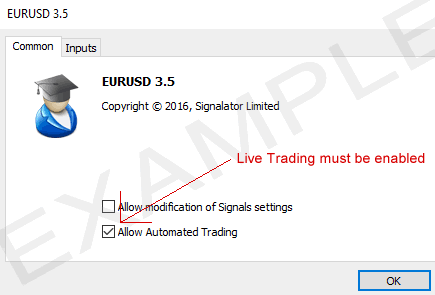
Common TabMost likely nothing is to be changed. Please make sure you have Long&Short positions option chosen and Allow live trading check box is checked. This will allow autotrader to trade and to execute both Long and Short trades.
Choose The Subscribed Signal
Signalator provides one EA / Autotrader file to all signals.
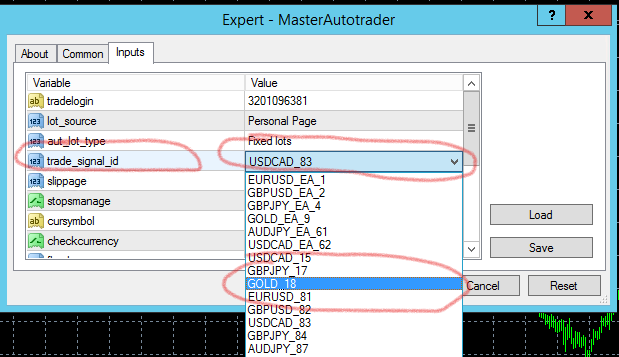 When you attach this file, you shall choose the required signal from the drop-down menu of the "trade_signal_id" field.
Navigate this row and click on the value to choose from the options within the drop-down menu. If you are not sure which signal to choose, contact your manager.
Once the signal is chosen all the required settings are automatically applied.
Autotrader Settings
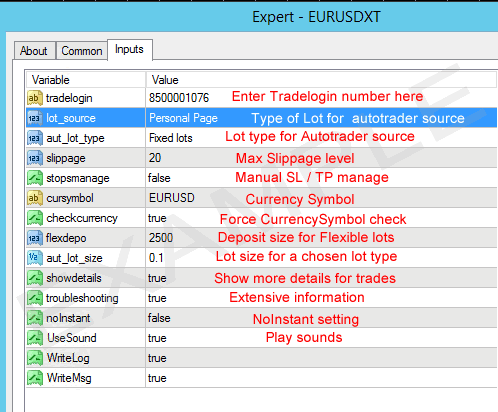
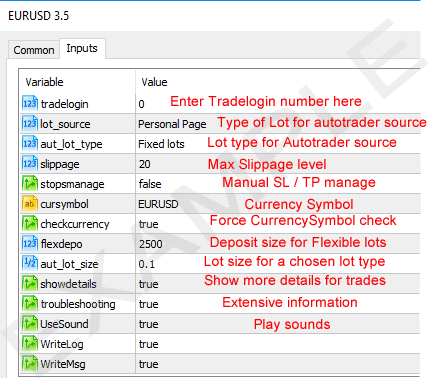
Inputs Tab All Autotrader settings are configured within this tab.
Tradelogin. IMPORTANT! Put your tradelogin (taken from Autotrader Tradelogin within My Subscription page) into tradelogin field. Tradelogin identifies you with the website. This is used to connect your subscription with your EA and your trading account. Autotrader won't work if you do not configure this option. If you are not sure what is your "tradelogin", please contact your manager.
lot_source. Autotrader may get trade details from either your personal page on the Signalator website (Personal Page option) or take details directly from autotrader settings (Autotrader option). If you choose Personal Page option, you will be able to manage lot type and lot size directly from your personal page from anywhere at any time wherever a trade platform is installed. If you use autotrader settings, you will have to access an autotrader to modify it.
LOT SIZE SETTINGS ON PERSONAL PAGE. If you choose Personal Page for lot_source option, an autotrader will take trade details from your personal page settings. It is very convenient to set lot trading directly on your personal page as you can always check / update these details simply by logging on to your personal page. Below you will find an example of how lot size settings page looks like. To set a required lot size, you have to make sure you have Autotrader checkbox activated and then choose Lot Type (Fixed, Flexible or % of Deposit). If you use Flexible lot type, it is required to enter a deposit for calculation within Flexible Deposit field. Lot size for any lot type is set within Lot Size field. Then click the update button to save your settings. To find out which lot type is more efficient, please click here.

LOT SIZE SETTINGS WITHIN AUTOTRADER. If you choose Autotrader option, your autotrader will be taking lot size details from settings within autotrader. Firstly choose lot type with aut_lot_type option (Fixed Lots = Fixed; Flexible Lots = Flexible or % of Deposit). Lot size is set within aut_lot_size field (regardless the type of lot you choose). If you use Flexible Lots option, it is required to use flexdepo value as a basis for lot calculation. More detailed information on how to choose the most efficient lot type or how lots are calculated, you may find here.
All other options are set within Inputs tab within autotrader only.
Slippage. Very rarely by the time an autotrader gets a trading alert, a price may move dramatically. Set the maximum slippage level to cancel a trade opening in case a price is more than a "Slippage amount" pips away from Signalator open price.
noInstant. If you can't set SL / TP levels prior to open a position, set noInstant value to true. An autotrader will open a trade first and then will update SL / TP levels.
Cursymbol. For additional security purposes, add the symbol title of your broker you attach an autotrader. If your broker has EURUSDecn, EURUSDmini, etc. symbol, simply add this value to this field.
Checkcurrency. In most case brokers use either common or commonly accepted symbols. When you attach an autotrader to a chart, an autotrader will check whether you attaching it to the right pair. However, in some cases, a symbol may be very uncommon and an autotrader won't be able to validate a currency pair even if you place it on a right chart. Set the checkcurrency to false and an autotrader won't be validating a currency pair symbol.
Showdetails. By default all operations made by an autotrader are accompanied with text details. However, if you would like to have more details (true by default), choose this option. If this is set to true, every time a trade is opened, a message with type of lot and lot size will be inserted.
Troubleshooting. If for some reason you experience any difficulties with an autotrader, use this option in true state (default value) to generate detailed information which can help you or Signalator support better and faster identify a problem occurred. More detailed information is available on Automated Trading Installation Errors page.
Stopsmanage. If you change a SL / TP level manually, an autotrader will then change it to the value passed from an alert. To leave your levels entered manually, set stopsmanage setting to true. Please note: in that case, an autotrader won't update these levels until you set the value to false.
UseSound. If you would like to hear sounds an autotrader generates, leave it as true value. Sounds are very helpful to identify everything is made correctly even without checking a trading platform.
WriteLog and WriteMsg. These options are used for storing information about errors and operations made by an autotrader.
Step 8. Make sure you have activated the AutoTrading within your trading platform. If you see green arrow within the Auto Trading button, then the AutoTrading is enabled (as shown on the picture). If you see a red square, simply click the button to activate the Automated Trading.
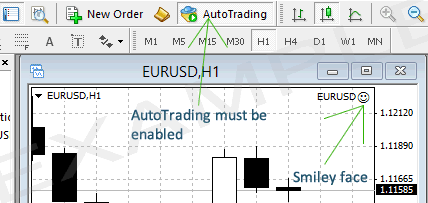 If everything works correctly you will see a "smile green face image" at the top right corner of a chart you installed the autotrader to. If you see a "sad red face image", then something went wrong.
If this is not the case, check all the previous steps and settings you used.
If you face any errors with an autotrader, please refer to the Autotrader Errors page first. If you believe you have done everything as described above and autotrader still does not work, please contact us and we will solve this problem.
Please note: you must leave your trading platform running and connected to the internet during the working days, otherwise trades won't be executed on your trading account. You may use Signalator VPS to host your trading platform.